WooCommerce custom product pricing: charge for the design
A flat price lets simple orders subsidize complex ones. Here's how to price custom WooCommerce products by what customers design, with a worked margin example.
 Rafael
Two customers buy the same custom t-shirt from your WooCommerce store on the same afternoon. One types a first name on the chest. The other uploads a photo that fills the whole front, adds a quote across the back, and drops a logo on the sleeve. Both pay $29. Only one of those orders made you real money.
That's the problem WooCommerce custom product pricing has to solve: the price should follow what the customer actually designs, not the blank it's printed on. WooCommerce doesn't do this on its own, and most "dynamic pricing" plugins solve a different problem entirely, because they're built for discounts.
This guide shows how to charge for the design itself. You'll see a worked margin example, the seven design properties Chamevo's pricing engine can charge for (read straight from the code that ships in the plugin), the one setting merchants most often get wrong, and a short playbook for rules that protect margin without scaring buyers off at checkout.
TL;DR
- A flat price on a customizable product means simple orders quietly subsidize complex ones.
- WooCommerce custom product pricing charges based on what the design contains: characters, lines, text size, print area coverage, number of elements, colors, and print locations.
- Discount plugins key off who buys and how many. Customization pricing keys off the design. They're different tools.
- Rule groups run in one of two modes. Any stops at the first match (use it for tiers). All adds every match (use it for stacking surcharges).
- Show an itemized breakdown before checkout. On Baymard Institute's list, extra costs are the top abandonment reason among shoppers who weren't just browsing.
Why flat pricing breaks on customizable products
Flat pricing works when every unit costs you the same to make. Custom products break that assumption the moment a customer opens the customizer. A name on the chest uses a small transfer and one press. A full front, a back print, and a sleeve use three transfers, three presses, and a lot more film and ink.
The chart below puts numbers on it. It's a worked example, not research: the costs are assumptions for a direct-to-film (DTF) shirt shop, printed on the chart so you can swap in your own.
With a flat $29 price, order A leaves $19.50 and order B leaves $5.00. Now add two simple rules: a surcharge for each extra print location, and a surcharge when a print area is more than half full. Order A still costs $29, so your simple buyers pay exactly what they did before. Order B now costs $46 and leaves $22.00.
Notice what didn't happen. You didn't raise the price for everyone to cover the worst case. That's the usual fix, and it's the wrong one, because it makes your most common order (a name, a date, a short line of text) look expensive next to competitors.
There's a second cost that's easy to miss. The complex orders are the ones customers post, share, and reorder for their team or family. If each of those sells at a thin margin, your best marketing is also your least profitable work. We've listed flat pricing among the common customizable product mistakes for exactly this reason, and it's why margin math matters when you pick which customizable products to sell in the first place.
What WooCommerce custom product pricing actually means
WooCommerce custom product pricing is a set of rules that adds to a product's base price based on what the customer designs: how many characters they type, how much of the print area they fill, how many colors or print locations they use. The price updates live as the design changes, so the customer sees the cost before adding to cart.
That definition matters because the phrase "dynamic pricing" usually means something else in the WooCommerce world. Most plugins sold under that label handle discounts: quantity breaks, prices for wholesale customer roles, cart-total offers, buy one get one. They answer the question "who is buying, and how many?"
Customization pricing answers a different question: "what did they design?" The two don't compete. Plenty of stores run both.
| Discount-style dynamic pricing | Customization pricing | |
|---|---|---|
| Price moves because of | Quantity, user role, cart total, coupons | Characters, lines, coverage, colors, elements, print locations |
| Direction | Usually down (a discount) | Usually up (a surcharge for extra work) |
| Calculated when | In the cart | Live, while the customer designs |
| Needs to know | The customer and the cart | The design itself |
| Typical tool | A dynamic pricing or discount plugin | A product customizer with pricing rules |
Native WooCommerce does neither. A simple product has one price. A variable product gives each variation (say "Blue, Large") its own price, which works for a fixed list of options. Design complexity isn't a fixed list, though. A text can be 4 characters or 40, and a print area can be 3% full or 90% full. You'd need a variation for every possible design.
The official Product Add-Ons extension gets closer. You can attach a price to a text field as a flat fee, a quantity-based fee, or a percentage of the product price. Its documentation doesn't cover charging per character, per color, or by how much of a print area is filled, because it can't see the design. It only sees the form fields.
Pricing by design needs the pricing logic to live where the design lives: inside the visual product customizer. That's the category covered in our comparison of the best WooCommerce product customizer plugins. On Shopify, Inkybay is known for this kind of calculator; on WooCommerce, the options are thinner, which is why we're walking through how Chamevo handles it in detail.
Seven properties you can price on
We went through the pricing engine that ships in the Chamevo customizer and counted what a rule can measure. There are exactly seven properties. Each one fits a specific kind of production cost, and each is evaluated at a specific level, which is the part most documentation leaves out.
Here's where each one earns its place:
- Text Length counts characters without spaces, so "Happy Birthday" is 13, not 14. It's the natural fit for engraving, where machine time grows with every letter.
- Lines Length counts lines in a text. Use it for return address stamps, wedding verses, and plaques where layout work jumps with each extra line.
- Text Size reads the font size. It suits large-format lettering and vinyl signs, where bigger letters mean more material.
- Print Area Coverage measures how much of a print area is filled, from 0 to 100 percent. It's the closest proxy for ink and film on DTF, direct-to-garment (DTG), and sublimation work.
- Number of Elements counts the objects a customer places, such as photos in a collage or extra logos on a team shirt.
- Number of Colors Used counts unique colors across the whole design. Screen printers need this, since every color is another screen and another setup.
- Print Locations counts how many print areas hold a design across all product views. Front, back, and sleeve count as three, and the rule runs once per design.
The "evaluated for" column changes the math. A Text Length rule aimed at all texts checks each text separately, so a design with two long texts can trigger the surcharge twice. A coverage rule runs once per print area, which is how order B above paid a coverage surcharge on the front and on the back. Print Locations runs once for the whole design, no matter how many views the product has.
One detail protects you from charging for your own template: upload zones never count. An upload zone is the empty placeholder where a shopper drops a photo. It isn't counted as an element, and an empty upload zone doesn't mark a print location as used. So a shirt with a photo placeholder on the back won't charge a second-location fee until the customer actually puts something there.
Coverage is easier to price fairly when customers can see the print on the real product. If you sell mugs, tumblers, or apparel, pairing coverage rules with a WooCommerce 3D product customizer means the buyer sees exactly how much of the surface they're covering before the price moves.
Separately from rules, individual elements can carry their own price (a premium graphic, for example), and specific colors can carry a surcharge, like gold foil. Rules handle what the customer builds; element prices handle what they pick from your library.
How pricing rules evaluate: any vs all
Every pricing group has a match mode, and it's the WooCommerce custom product pricing setting we see merchants trip over most. The group holds a list of conditions (greater than 20 characters, add $5), and the mode decides what happens when more than one condition matches.
- Any checks the conditions from top to bottom and stops at the first one that matches. It's built for tiered bands: one price for short texts, a higher one for long texts, never both.
- All checks every condition and adds up every match. It's built for surcharges that should stack, like a fee for a second print location plus another for a third.
Here's the same input run three ways. The text has 25 characters, and there are two conditions: over 20 characters adds $5, over 10 characters adds $2.
In Any mode with the highest band first, the 25-character text matches "over 20" and stops: $5. In All mode, it matches both: $7. Both are correct; they just express different pricing ideas. The third column is the mistake. In Any mode, order matters, and if the cheaper "over 10" condition sits on top, it matches first and the $5 band never fires. Your long engravings sell at the short-engraving price, and nothing looks broken.
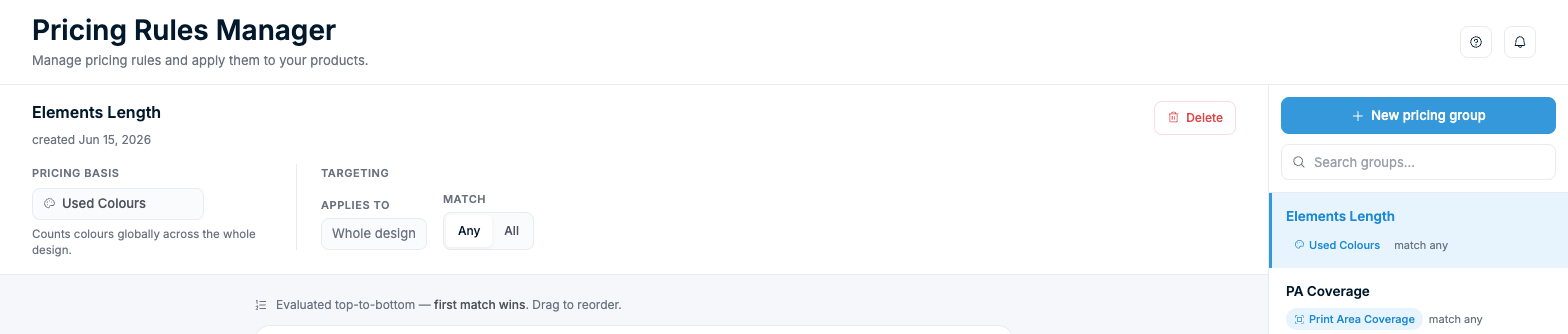
The Pricing Rules Manager says it right above the rule list: conditions are evaluated top to bottom, and the first match wins. You can drag them into a new order. Our rule of thumb: in Any mode, sort conditions from the highest threshold to the lowest. In All mode, order doesn't change the total.
A quick way to pick the mode is to finish this sentence out loud. "Long texts cost $5 instead of $2" is a tier, so use Any. "Each extra print location adds $4" is a stack, so use All. If you can't say the rule in one sentence, it's probably two groups.
Showing the price breakdown before checkout
A price that climbs while someone designs can feel like a trap if it isn't explained. That's not a small risk. Baymard Institute puts the documented average cart abandonment rate at 70.22% across 50 studies. In its latest survey of abandonment reasons, once the shoppers who were just browsing are set aside, 40% said extra costs were too high, the most common reason on the list.
Customization surcharges are extra costs by definition, so any WooCommerce custom product pricing setup has to earn the customer's trust. The fix isn't to hide surcharges; it's to show where each one comes from while the customer is still designing, so nothing new appears at checkout.
Chamevo's engine records a line item for every rule that matches. Each line carries what was measured (for example Print Locations), which elements it applied to, the condition that matched, and the amount. The price breakdown panel then lists the WooCommerce product or variation price, the surcharges one per line, a subtotal and quantity row when someone orders more than one, and the total.
On WooCommerce, you place that panel with the [chamevo_pricing_breakdown] shortcode or the Chamevo Pricing Breakdown widget in Elementor, so it can sit right next to the add-to-cart button. When the customer adds the product to the cart, the line item carries the full customized price. As a safeguard, the plugin never lets that cart price drop below the WooCommerce price you set for the product.
An itemized list changes how a $46 shirt reads. "$46" alone raises the question "why?" A list that says "+$5 second print location, +$4 third print location, +$4 front over 50% full, +$4 back over 50% full" answers it before it's asked, and it tells the buyer exactly which choice to change if they want a lower price.
Custom product pricing strategies that protect margin
The engine is only half the job. Good WooCommerce custom product pricing depends just as much on which rules you write. Here's the playbook we'd start with.
Price in bands, not cents per unit
"$0.25 per character" sounds precise, but it makes every keystroke visibly cost money, and customers start trimming their text. Bands feel calmer: up to 12 characters included, 13 to 25 adds $4, over 25 adds $8. Build them as one Any group, highest band first.
Charge the setup, not the pixel
Your real cost jumps in steps: a new screen, a second press, another hooping. Price those steps. Number of Colors Used and Print Locations map directly to setup work, and they're far easier for a customer to understand than a coverage percentage.
Make the first personalization free
Fold the most common design into the base price, usually one print location with a short text. Customers see a clean starting price, and the surcharges only appear when they choose to do more. In the worked example, that's exactly why order A still costs $29.
Test where the threshold sits
Look at your last 100 orders before you set a band. If most names are under 12 characters, a threshold at 10 charges half your customers and feels like a tax. A threshold at 15 only touches the long ones. Move one threshold at a time and watch conversion for a few weeks.
Keep the rule count small
If you can't explain your pricing in one sentence per group, customers can't either. Three or four groups cover most shops. Each should map to a real production cost you could point to on the shop floor.
Once the price is right, the rest of the order has to hold up too. Surcharges only protect margin if the file your team receives prints without manual fixes, which is where print-ready file export comes in. The Chamevo WooCommerce product customizer handles both ends: it prices the design live on the product page and hands your team print-ready files after checkout.
WooCommerce custom product pricing FAQ
Does WooCommerce price per character natively?
No. Core WooCommerce prices a product or a variation, not the text a customer types. The official Product Add-Ons extension can attach a flat, quantity-based, or percentage-based fee to a text field, but per-character pricing needs a tool that reads the design, such as a product customizer with a Text Length rule.
Do I still need a dynamic pricing plugin?
Only if you also want discounts. Pricing rules in Chamevo add surcharges based on the design. They don't look at user roles, cart totals, or quantity breaks, so if you run wholesale pricing or bulk discounts, keep a discount plugin for that job. The two sit side by side without overlapping.
Can I price by how much of the print area is filled?
Yes. The Print Area Coverage property measures how full each print area is, from 0 to 100 percent, and runs once per print area. A rule like "over 50% adds $4" charges the front and the back separately if both are more than half full.
Does this work with variable products?
Yes. The WooCommerce product or variation price stays your starting point, and matched rules add to it. The price breakdown shows that price as its own line, so a customer choosing a larger size sees the size price and the design surcharges separately.
Which Chamevo plan includes pricing rules?
Advanced pricing rules are included on the Growth plan ($89 a month) and above, alongside 3D visualization. Every plan starts with a 14-day free trial, and you can compare plans on the Chamevo pricing page.
Does the surcharge show in the cart and on the order?
The cart line item carries the full customized price, surcharges included, and WooCommerce multiplies it by the quantity as usual. The itemized list of surcharges appears on the product page in the price breakdown panel, before the customer adds the product to the cart.
Price the design, not the blank
WooCommerce custom product pricing comes down to one shift: stop pricing the blank and start pricing the work. Here's what to take away:
- Flat prices hide losses on your most complex, most shared orders.
- Discount plugins and customization pricing solve different problems. You may need both.
- Seven properties cover real production costs: characters, lines, text size, coverage, elements, colors, and print locations.
- Use Any for tiers (highest band first) and All for stacking surcharges.
- Show the breakdown before checkout, so extra costs never arrive as a surprise.
Start with one bestseller. Write down what its simplest and most complex orders cost you to make, set two or three rules that close the gap, and place a test order to check the breakdown. You can do all of that inside the Chamevo WooCommerce product customizer during the 14-day free trial, with no transaction fees added to your orders.